Sunday, January 31, 2021

Happy Winter Village Card


Annie’s Ink-Lings


I'm entering this card in a Tic-Tac-Toe Challenge PP256 over at Paper Players Bog.  I chose the right side column of the Tic-Tac-Toe card, from top to bottom:  scene, sparkle, and blue.  

I just love the die I used on this card.  It is called Winter Village by Penny Black.  You can make so many different scenes with it just by where you separate the die cut into sections.  The navy blue panel is embossed with the Stampin' Up Winter Snow Embossing Folder. The navy blue card stock is white on the opposite side, so a bit of white shows through on the embossing folder snowflakes.  I really like the effect it gives, plus the snowflakes are a really pretty design.


The light blue card stock that I used for the sky came with white embossed snow spots on it.  It really adds a perfect touch to the scenery.  The gold jewels and the gold card stock panel backing to the sentiment add just the right amount of sparkle to tie it all together, plus the white card stock that I used for the die cuts is sparkly.

Recipe
White Card Base: 9” x 6” (4 ½” X 6” folded)
Navy Blue Panel: 4 ¼” x 5 ¾”
SnowFlake Paper Panel: 4” x 5 ¼”
White Sparkle Card Stock for the Die Cuts: 2” x 8” strip

Penny Black Winter Village Die Set #B07VHYCXM
Spellbinders Nestabilities Standard Circles Large Dies #S4114
Sentiments from Stampin’ Up: Happy Scenes #139821 on the front and inside from Under My Umbrella #151518
Stampin’ Up Winter Snow Embossing Folder

Stay healthy and warm - see you next time.

Blessings,
Annie


Monday, January 25, 2021

Plant Dreams


Annie’s Ink-Lings


While sitting here in my studio looking out the window at the cold and cloudy sky, I noticed that a beautiful blue was starting to appear through the clouds, then a few rays of sunshine started breaking through.  I kind of faded away day dreaming, thinking about what I was going to plant in my flower beds this coming spring.  And then suddenly my mind jumped to card making and I knew which stamp I could use in the Paper Players Sketch Challenge:  PP525.


The Stampin' Up stamp set called Garden Shed has the sweetest little pots, flower, and shovel stamp just the right size for what I needed.  Plus, included is a sentiment about planting dreams.  How perfect is that since it all started with me day dreaming!  Here's the finished card.


Wanting the focal point to stand out, I colored the image with some bright colors using Stampin' Blends.  The designer paper is from an older paper pack called Country Lane from Stampin' Up.

Thanks for checking out my card for today.

Blessings,
Annie


Sunday, January 24, 2021

Make Your Own Background


Annie’s Ink-Lings


Here's a card I made for the Simon Says Wednesday Challenge Blog, MAKE YOUR OWN BACKGROUND.  Actually, I ended up making two backgrounds and it was so fun - first background on the card base and a second background on the layered panel.


First, I stamped the Retro Sparkle background stamp on the card base.  Then I punched little yellow sparkles and 3 red stars and randomly pasted them onto the card base.

The second background was made by inking the embossing folder with red, yellow, and stucco ink and then embossing onto a white panel, layered onto a red panel.  The "You're a Star" sentiment is a die from Simon Says.  I finished off the card by layering three sizes of yellow and red stars and gluing to the lower left of the embossed panel.  Just a fun and cheerful little card.

Supplies:
Simon Says You’re a Star SSSD111727
Stampin’ Up Dainty Diamonds Embossing Folder #152702
Color Box Ink Pads: Scarlet, Canary, & Stucco

It's so nice of you to take time to view my blog.  I love to share!

Blessings,
Annie


Thursday, January 21, 2021

Coffee & Friends


Annie’s Ink-Lings


One of my favorite drinks is a Mocha.  So when this challenge came up at Cardz 4 Galz, I was definitely in.  The challenge is #138 Cocktails, Wine or Coffee.  I have a great supply of coffee related stamps to choose from.  The hard part was choosing which ones to use.  Here they are, all mounted on my card.


Having chosen three stamps to use necessitated making a slimline card.  As you might guess, I never know what size card I'm going to make until I've chosen my stamps.  The twill coffee ribbon I used was just the perfect embellishment, along with three small pink acrylic dots.  I used both Stampin' Up Stampin' Blends and Copic Markers to color the images.  The brown panel was mounted with Stampin' Up Adhesive Strips.  They are nice and long, and are really handy when you want to 3D a large area. Using a blender brush and Dune (color) ink pad, I brushed on a little ink around the borders of the white panels before adhering them to the pink layers.

Here are the supplies I used:
Inkadinkadoo - Sentiment and Image stamps
Ann-ticipations Coffee Background stamp
Pink Acrylic Dots
Corner Rounder
Stampin' Up Adhesive Strips (3D)
Picket Fence Studios Blending Brush
Color Box Ink Pad - Dune

Now, I think I just need to go make myself a mocha, relax a little, and think about my next card!

Blessings,
Annie


Monday, January 18, 2021

Snowy Mountain Cabin


Annie’s Ink-Lings


Today I've made a card to enter in a challenge at The Paper Players Blog.  The theme is snow and the guidelines are:  CLEAN AND SIMPLE + MINIMAL LAYERS + LITTLE TO NO EMBELLISHMENTS + LOTS OF CLEAN WHITE SPACE (NO PATTERN).  


Wow!  Until I started to work out an idea, I hadn't realized just how much I  use  layers and patterns.  So this actually was a challenge for me to keep it clean and simple.  Well, here it is -  I'm happy with it.


I really love this stamp.  Having a cozy cabin in the middle of the woods sounds like heaven to me.  Hey, I can dream can't I?

Here's what I used to design the card:

White Card Base 11” x 4 ¼”, top folded
Black Panel 3 1/8" x 4 1/2" 
White Panel 3 ½” x 4 ¾”
Stampin’ Up Snow Place Stamp Set (sentiment)
Impression Obsession H1830 Winter Snow Mountain Cabin 
Tim Holtz Distress Ink Speckled Egg

Until next time . . .

Blessings,
Annie


Friday, January 15, 2021

Quick & Easy #2


Annie’s Ink-Lings


I'm back with another Quick & Easy card today  This one I made to enter in a challenge at Fab Friday  The challenge this week is to make a card according to this sketch.


I actually didn't have an idea of what I was going to do -- just started by choosing some coordinating card stock and ended up making a some-what unusual Valentine's Day card.  But isn't that the fun of card making?  Just letting it evolve as you go along.


The finished size of the card is 4 1/4" H x 5 1/2" W, which is side folded.  The love heart is adhered to a piece of corner-rounded card stock.  While trying to decide on embellishments, I remember that I had some green and magenta organdy ribbon.  I think it adds a nice touch.  In order to get more color with the crystal dots, I hole punched small circles of matching color card stock.  I then glued the circles to the card and then glued the crystal dots to the circles - three on the lower left side and one on the upper right side for a nice balance.  

Recipe
Green Card Stock 4 1/4" x 11"
Magenta Stripe Card Stock 3 1/4" x 4 3/4"
Patterned Card Stock 3 1/4" x 4 3/4"
Savvy Dies Love Heart #10061

It was fun working on this challenge today.  Thanks for stopping by.

Blessings,
Annie


Thursday, January 14, 2021

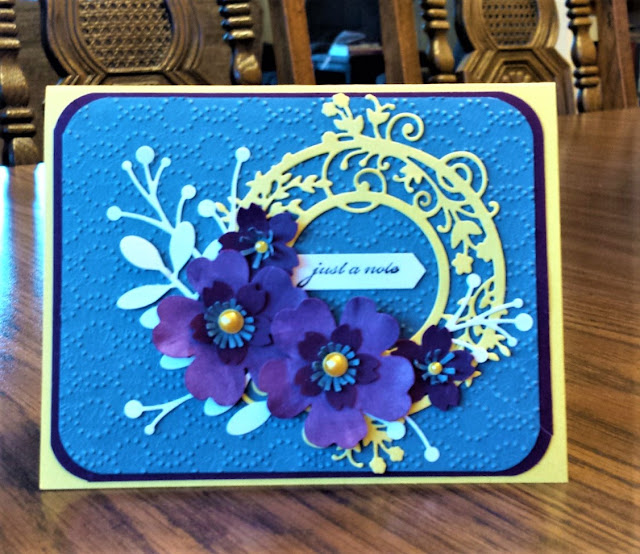
Pretty Purple Flowers


Annie’s Ink-Lings


Today's card was made to enter a Color Challenge at the Paper Players.  This certainly was a challenge for me because it is a combination of colors, yellow, blue, purple, and a neutral, that I normally wouldn't use together.  So I was pleasantly surprised by the finished design and I plan to use this color combination again.  I love taking a challenge and trying something new.


I embossed the blue panel with the Stampin' Up Elegant Dots embossing folder.  Both the blue panel and the purple panel have the corners rounded.  The flowers were made with three sizes of flower punches.  To make the large petals stand out, I sponged a bit of lavender pigment ink on them.  For the flower centers, I used a hole punch on yellow card stock, and topped it with a yellow pearl.  The result was a little border around the pearl, which makes the pearl stand out more.  

See below for measurements and supplies.

This card will be linked to the:  The Paper Players PP523 – Color Challenge

Yellow Card Base: 8 ½” x 5 ½ “ (4 ¼” x 5 ½” top folded)
Purple Layer: 4 1/8” x 5 ¼”
Blue Layer: 4“ x 5”
Stampin' Up Elegant Dots Embossing Folder #138287
Just Rite Garden Circle Die #DIE-05035
Memory Box Winterberry Sprig Die #98732
Memory Box Cottage Leaf Die #98342
Hand Hole Punch 1/8" and 1/4"
Stampin' Up Classic Label Punch
Saavystamps "Just a Note"

Thanks for checking out my card today.  I hope it has given you an idea or some inspiration to get busy making a new card.  Happy card marking!

Blessings,
Annie


Sunday, January 10, 2021

Shiloh Autumn, Book Review

Annie’s Ink-Lings


The prayer, below, is so appropriate for what we are going through now, due to this pandemic of COVID19, in particular with trying to comply and obey those who rule over us.

This beautiful prayer is from a book I'm reading called, "Shiloh Autumn," by Bodie and Brock Thoene, Christian authors. They are some of my favorite authors, by the way. It's about the families, two in particular, who live in Arkansas, telling us about their struggles during the depression, the bottom falling out of the cotton market, being cheated out of their cotton land, and being taken advantage of by unscrupulous people.

One by one, everything is taken from them by ruthless men. Amazingly, the farmers never give up hope - hope that is rooted in our Heavenly Father.

Here is a prayer from one of the share croppers, whose parents were slaves.

"Lawd," he said, "in that buildin' are the men You saw fit to have govern this land. They can do a heap of good for us and our families if they want to. Give 'em wisdom, Lawd. Let 'em see our cause and its justice. Give 'em hearts to understand that we ain't askin' for a handout; we're just tryin' to keep our homes and feed our families. Bless this land, Lawd. May all our thoughts turn to You and seek your will, so that this terrible depression will be lifted. Hear our prayer, so's we can all have honorable work that will pay enough to provide for our loved ones. Lawd," he was saying, "give us wisdom to trust in You, too. You done seen us through terrible times . . . and brought us through mighty deep waters since. Don't let us fail this test of faith right when we need it most. . . . In the mighty name of Jesus, Amen."'

Will you join me in this kind of prayer for the leaders of our country.

Blessings,
Annie


Wednesday, January 6, 2021

Swirly Scribbles Snowman


Annie’s Ink-Lings


We can't fight the winter weather, can we?  So I say just go with the flow and make pretty winter cards.  Everyone loves snowmen - right? - and what better time for making snowmen cards than winter.  After seeing a snowman made with Stampin' Up's Swirly Scribbles dies on Pinterest, I came up with a slightly different version.  See what you think. 


I used a Wink of Stella brush on the holly and berries on Mr. Snowman's top hat, however it doesn't show up very much in this picture.  The holly and berries were stamped separately, colored, fussy cut, and adhered with glue.


The holly and berries were also stamped on the inside of the card.  Just love the sentiment - perfect for this card.

Here's the recipe:
 
Blue Embossed Panel 3 ¾” x 5 3/8”
Red Panel 3 7/8” x 5 ½”
Snowflake Patterned Paper 4 3/8” x 6”
Red Card Base 4 5/8” x 6 ¼” folded (9 ¼” x 6 ¼”)
White Sentiment Panel 3 7/8” x 5 ½”

Stampin’ Up Swirly Scribbles Die Set
Stampin’ Up Softly Falling Embossing Folder
Stampin’ Up Snow Place stamp set (hat, scarf, holly & berries)
North Woods #394388 “There’s no people like snow people”
Rubber Soul #1743-G “Cool Winter Wishes”
Lockhart Stamp Co. #3069 Holly & Berries
Copic Markers #R29 Lipstick Red and #G17 Forest Green
Wink of Stella Brush Glossy Clear

Important Tip:  Once you have die cut the swirls, cut off the most outside section of each one and trim all the buds and ends that are sticking out.  This makes the dies better fit the blue panel.  

1. Stamp all images, cut out, and color.
2. Stamp inside sentiment. Also, stamp bottom left with holly & berries stamp and
     color.
3. Stamp “Cool Winter Wishes” on bottom of blue panel, then emboss.
4. Score card base at 4 5/8”, fold, and layer all panels. Adhere inside sentiment
     panel.
5. Trim all die cut swirls. Adhere the swirls first, then the rest of the images. Brush
     Wink of Stella on the holly and berries.

Have a great week whatever is on the agenda!

Blessings,
Annie


Monday, January 4, 2021

Book Card Fun


Annie’s Ink-Lings


Besides stamping, another thing I love to do is read.  I'm in a real comfort zone when I'm snuggled under an afghan in my rocking recliner, my kittie KoKo curled and dozing in my lap, in front of a warm fire, and a delicious mocha and a good book in hand.  Oh, so warm and comfy, I lose track of time.

Books are the theme of today's card, brought on by the donation of a super bag of books to our church library.  As church librarian, I always like to send a card of thanks to the thoughtful doner of the books.  This is the first time I have used this stamp set by Taylored Expressions, called "In Other Words - Read."  I love the sentiments in this set,  and I especially love the sentiment I used on this card.


This is an A2 top-folded card; notice the rounded corners.  The stack of books was stamped on white card stock and colored with Copic Markers.  Next I fussy cut the image and used 3D tape to mount it on the yellow-dotted panel.  I really like how the three black acrylic dots add to the design by filling some of the space on the aqua blue panel.


Also, for the first time, I used a border from Pretty Pink Posh "Scallop Borders 2."  I am really pleased with the look of the stitched scallop border.  It's such a nice finished look.  Here's the recipe for making this card.  I hope you will try the design with whatever stamps you choose.

Measurements & Card Stock
Black Card Base 4 1/4” X 11, top fold and round corners.
Black Decorative Paper 4 1/8” x 5 3/8”, round corners.
Black Card Stock Panels, cut one of each size, 4 1/8” x 3” and 2 3/8” x 6”
Aqua Decorative Paper 4” x 2 13/16”
Yellow Dot Card Stock 2 ¼” x 5 ½”
Sentiment Panels: Black Card Stock 2 ¼” x 1 3/8”
White Card Stock 2 1/8” x 1 ¼”

Tools
Taylored Expressions #TEMS75 In Other Words - Read
Pretty Pink Posh Scallop Borders 2
Crop-a-Dial Corner Rounder
Black Acrylic Dots
Copic Markers:   Lemon Yellow Y13
                            Acid Yellow Y08
                            Cool Shadow BG10
                            Aqua Blue BG01
                            Mustard Y26
Black Momento Ink Pad

I hope you've enjoyed today's card.  Let me know what you think of it.
Blessings,
Annie