Tuesday, August 21, 2018

A Heavenly Gate Fold Shutter Card

Annie’s Ink-Lings


Welcome to my blog today,

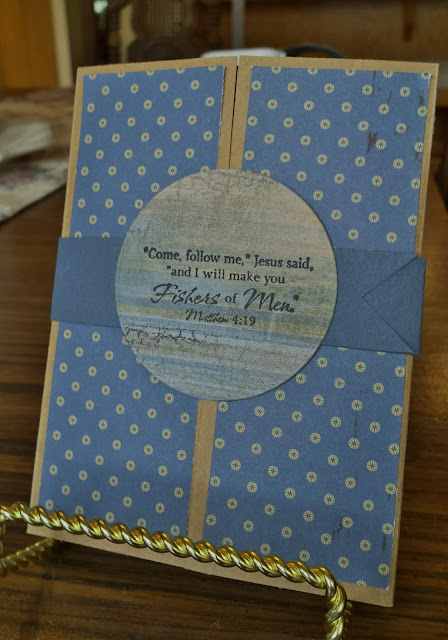
Don't you just love to make cards using fun fold ideas!  I can't get enough of them and am constantly searching for new ideas.  But today I returned to the Gate Fold Shutter Card, which has been around for quite a while.  I had a hankering to use some of my Our Daily Bread Designs stamps and thought this fold would work well with the two sentiments I chose.  So take a look at the pictures and let's get started.

This view shows the card closed with the belly band in place.  It easily slips off the card either up or down.


Here you can see the card with the belly band removed and the shutters just a tiny bit open.  As you open the card all the way, the shutter panels are pulled open to reveal the sentiment.

In order to stand up the card I didn't open the card all the way, so that is why a bit of the sentiment is not showing.

I really enjoyed making this card so I made three of them.  And now some more fun - taking a couple of them to the post office for mailing to a couple of special someones!


Gate Fold Shutter Card – 8 ½ x 5 ½ Card Base

1.         Card Base: 
            a.         Score at 2 1/8 & 6 3/8.
            b.         Fold on score lines.

2.         The two outside panels of decorative paper are 5 ¼ x 1 7/8.
            a.         Adhere the two panels to the front of the card.

3.         The inside center panel is:
            a.         Decorative paper (coordinating design) – 4 x 5 ¼.

4.         The inside mounted panel is:
            a.         Colored card stock – 3 x 5 ½
            b.         Decorative paper – 2 ¾ x 5 ¼
            c.         Adhere them together.
            d.         Using a 2 ½ round punch or die, cut a circle in the middle of the panel.
            e.         Lay aside.

5.         The shutter:  2 pieces of colored card stock 3 ½ x 4.
            a.         At one end score at ½.  This will make the scored off section measure 3 ½ x ½ .
            b.         At the opposite 3 ½ end, make a pencil mark on the edge at the center – 1 ¾ .
            c.         Make another mark 2” above the first mark.
            d.         Cut from each corner end to the 2” mark, making a big “V” shape.
            e.         With the “V” shapes facing each other, fold the ½” scored section
                        toward the back on both pieces.

                                                                                         ß  4”  à
                          ­­­­­­­­­__________________
                          |    .                             |
                          |    .                 ß2”à      | á
                          |1/2 .            .________.| 3 ½ “
                          |    .                             | â
                          |    .                             |
                          |_________________        |

         f.          Place Score Tape on the end of the scored sections.
            g.         Place the folded panels just outside the centerfolds of the card, left and right, align the
                        shutter pieces across the top and bottom, then remove tape and adhere in place.
            h.         On the left shutter piece, snip about ¼” off both points.  The left
                        shutter overlaps the right shutter.

6.         On a 2 ½ x 2 ½ piece of coordinating decorative paper or card stock, stamp a very small
            sentiment.  With the card laying open and the shutter flaps overlapping, you can see the size 
            of the space for a sentiment.

7.         Use 4 dimensionals to stick the panel to the center of the card.
            a.         Be sure to place the dimensionals one at each top corner of panel.
            b.         Adhere the panel over the two shutter pieces.
            c.         Adhere an anchor charm to the right bottom of the panel as shown.
           
8.         Two Side panels inside the card:  Colored Card stock 1 ¼ x 5 1/2
                                                                  Decorative paper 1 x 5 ¼

9.         Belly Band – 1 x 11”
            a.         Place the right end of the band at the front of the card at the right edge.
            b.         On the left edge of the card, fold the band around the back and to the front, placing
                        the end underneath the previous piece of the bank.
            c.         Glue or DS tape in place.
            d.         Cut a notch in the showing right end.

10.       Belly Band Embellishment Option 1:
            a.         Punch or die cut a 2 ½” circle from card stock.
            b.         Stamp a sentiment on it and attach to center of belly band.

Stamps:           Our Daily Bread Design The Waves of the Sea
Die:                 Nesting Circles (Lifestyle Crafts, the 2 ½ “ circle) or you can use a 2 ½ “ punch.

11.       Belly Band Embellishment Option 2:
            a.         Cut one each: 
                                    Light colored card stock 1 ¾ x 2 ¼
                                    Coordinating colored card stock 2 x 2 ½
            b.         Stamp the Fish Net image on the 1 ¾ x 2 ¼ card stock (I used Antique Linen Distress 
                        Ink).
            c.         Distress the edges with Memories Midnight Blue.
            d.         Over stamp with the anchor image using Memories Midnight Blue.
            e.         Layer this piece onto the colored card stock piece.
            f.          Adhere it to the center of the bellyband.

Stamps:           Anchor (dragonflylaser.com); Happy Birthday (Stampin’ Up); Fish Net
                        Background (Our Daily Bread)
Die:                 Nesting Circles (Lifestyle Crafts, the 2 ½ “ circle) or you can use a 2 ½ “ punch.

Hopefully the instructions are clear.  However, if you have a problem, please contact me.  I'm more than happy to answer questions.

Blessings,
Annie

Saturday, August 18, 2018

Daisy Corner Pop-Up Card

Annie’s Ink-Lings


Hello friends,

I just learned this new fold and am excited to share it with you.  Some call it the Daisy Corner Pop-Up Card and others call it the Daisy Corner Flip-Down Card.  You can choose which name you like best.  😊  The directions seem a bit lengthy but the card is quite easy to make and really doesn't take that long to assemble once you get all the pieces cut.  I hope you will give it a try as it is definitely a fun fold.


The card base is 8” x 8” white card stock.
Score on two sides at 4”
On the upper right quadrant pencil in the words “Inside of Card.”
Fold the card base both ways at the 4” score lines, using a bone folder.

On the lower right quadrant, score from the bottom point to the center of the card.
At ¼” on the left side of the score line, cut away the rest of that section.
Fold the ¼” strip upward and use bone folder
* * *
                                                                                             
 Turn the card base over and place an “X” in the center of the upper right quadrant.  This is where you adhere the decorative paper panel.
Cut a 3 ¾”  by 3 ¾” decorative paper panel.  On the back of the panel, use the tape runner on all four sides plus across the middle three of times.  Adhere to the card base over the “X.”
* * *


Place a 2 ¾” circle die in the center of the decorative paper panel.  Hold in place with a piece of Washi Tape.  
* * *


In order for you to use your Big Shot, fold the left portion of the card base over the die and decorative paper panel of the card base.  Run through a Big Shot.  Don’t be concerned about the indentation that shows on the opposite side as it will be covered up.
* * *

 
Cut two more 3 ¾” x 3 ¾” decorative paper panels; one like the front panel and one that coordinates with it.  Adhere those in place.
* * *

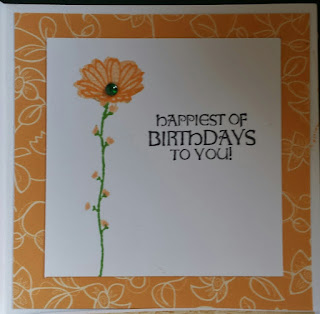
 On a 3” x 3” square of white card stock, stamp a flower and a sentiment.  For the flower, I used the Stampin’ Up set called Daisy Delight and Distress Inks, stamping the flower base with Dried Marigold and the outline stamp with Carved Pumpkin, the stem with Mowed Lawn, the flower buds with Dried Marigold. Use black ink for the sentiment.   Adhere the panel over the decorative paper on the upper right quadrant.
* * *


With the inside of the card facing up, fold the lower half of the card up.  Add strong tape to the ¼” diagonal strip and remove the protective strip.  While holding the right side steady, fold the left side of the card over the right side, making sure that the ¼” strip is securely adhered.  
* * *


When you open the card, the flip panel will slide down.
* * *


Using the original circle die and another that is just a bit larger, cut out  a round frame from white card stock.  Adhere the circle frame to the front of the card around the round cut out.
* * *
Stamp two Daisies from the Stampin’ Up Daisy Delight stamp set using Carved Pumpkin. Lightly color the Daisies with a Fantastix Coloring Brush using the Dried Marigold.  Punch them out using the Stampin’ Up Daisy punch.  Slightly mold the petals of both Daisies.  Use mounting tape to adhere them together.  Glue the assembled Daisy to the card, centering it in the circle.  Add a jewel on the center of the punched daisy and one on the small stamped Daisy for the finishing touch.

If you need help with the directions, please let me know.
Blessings,
Annie


I'm Crazy for the Crazy Birds!


Annie’s Ink-Lings


Hi Stampers,

I don't know why I ignored these little guys for so long.  Then all of a sudden, it seemed, I fell in love with Tim Holtz' Crazy Birds.  Whenever I look at their little faces, I just have to smile.  The images are so versatile that you can stick one of these little birds almost anywhere.  The card I'm sharing today is a "from scratch" flip card featuring one of these little fellas.  I have a flip card die, but when I came across directions for making one from scratch, I just had to give it a try.  Rather than attempting to repeat the directions here, I'm referring you to the directions on this blog.  Thank you, Allison Cope, for making the easy-to-follow directions available.


Here are the supplies I used:

Tim Holtz Alterations Bird Talk clear stamps  #561218
Spellbinders Nestabilities Labels 8 #S5-019
    I used the second from the smallest die to cut the design paper on which to layer the bird.
    I used the third from smallest die to form the flip card.
Distress Inks to color the bird:  Spiced Marmalade, Shabby Shutters, Pine Needles
Ranger Enamel Accents, Black:  for the eyes
Echo Park Paper Co. Designer Dies:  Festive Fall #EPPDIE32 for the leaves.  I die cut two sets of
    leaves, layering one set on top of the other.  This gives the leaves a bit more dimension.
Hot Off the Press clear stamps:  Just a Little Greeting #HOTP1121 Happy Birthday

Measurements:
Card Base:  5 1/2" x 8 1/2"
Striped designer paper panel:   2" x 5 1/4"
Checkered designer paper panel:  4" x 5 1/4"
White panel:  1 3/4" x 5 1/4"

Since I didn't have a word bubble small enough to fit the card, I stamped the sentiment, then drew the bubble with a black pen, and cut it out.

Now it's your turn to do some fun card making.

Blessings,
Annie


Thursday, August 9, 2018

Pop Through Butterfly Card

Annie’s Ink-Lings


Welcome paper crafters,

I love to use butterflies in my card crafting, so today brings a fun pop through card featuring a beautiful die cut butterfly. This card uses a minimum amount of designer paper, which makes it a great card for using up some of those scrap pieces you have left over.  Though made with scraps, it is a sweet little card that I think anyone would love to receive.  So let's get started!


Dimensions & Directions:
  • Colored card stock -  5-1/2″ x 8-1/2″, folded for card base
  • White card stock panel - 1-3/4″ x 4-1/4″
  • Coordinating designer paper, two pieces from the same print - 1-1/2″ x 4″
  • Coordinating green card stock
1.  Fold the card base.  This will be a top fold card.

2.  Adhere the designer paper panel to the white card stock panel.  Make a pencil mark 1” from the top and in the middle of the panel.  Line up the Classic Label Punch matching the point in the punch with the pencil mark on the panel, make sure the punch is straight and centered, then punch.

3.  Adhere the panel on the left front of the card ¾” from the left edge.

4.  Adhere the second piece of designer paper on the inside of the card directly in line with the front designer paper panel, as nearly as possible by just eyeballing it.


5.  Insert the card front into the punch and line the punch up with the punched out section of the panel, then punch through the card front.


6.  With the butterfly die cut, fold up the wings on both sides of the body.  Scoring makes the wings easier to fold.   Place a strip of Red Line Tape on the back side of the body.  With the card closed, fold the butterfly’s wings together and stick the body through the punched-out section, adhering it to the inside of the card.   Open the wings and brush them with the sparkle pen.

7.  Punch two scalloped borders from coordinating green card stock.  Glue in place on both sides of the panel.
8.  Die cut the letter "A" and the "Wow Moment," then on the right side of the card front, adhere the sentiment as shown.

9.  As an embellishment for the inside, I used the piece I punched from the front of the card and glued it crosswise on the decorative panel inside the card about 3/8" from the bottom.

Supplies & Tools:
Stampin’ Up Butterflies Thinlits Dies #137360
Lawn Fawn Alphabet Die Set #LF769
Technique Tuesday "Wow Moment" die #DlWowMo
Bone Folder
Glue Pen
DS tape or tape runner
1/8” Red Line Tape or other strong tape
Pencil
Ruler
Spectrum Noir Sparkle Pen Crystal Clear or Wink of Stella

When you need a quick and easy card, this is the one for you.  Now, go dig into your scrap bin and have fun!

Blessings,
Annie