Annie’s Ink-Lings
Welcome to my blog today,
Don't you just love to make cards using fun fold ideas! I can't get enough of them and am constantly searching for new ideas. But today I returned to the Gate Fold Shutter Card, which has been around for quite a while. I had a hankering to use some of my Our Daily Bread Designs stamps and thought this fold would work well with the two sentiments I chose. So take a look at the pictures and let's get started.
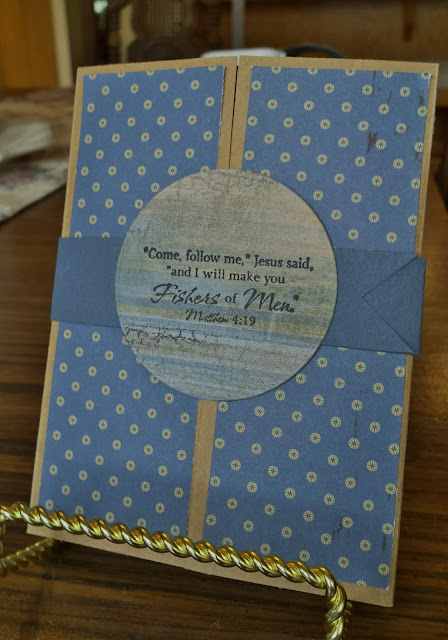
This view shows the card closed with the belly band in place. It easily slips off the card either up or down.
Here you can see the card with the belly band removed and the shutters just a tiny bit open. As you open the card all the way, the shutter panels are pulled open to reveal the sentiment.
In order to stand up the card I didn't open the card all the way, so that is why a bit of the sentiment is not showing.
I really enjoyed making this card so I made three of them. And now some more fun - taking a couple of them to the post office for mailing to a couple of special someones!
Gate Fold Shutter
Card – 8 ½ x 5 ½ Card Base
1. Card Base:
a. Score at 2 1/8 & 6 3/8.
b. Fold on score lines.
2. The two
outside panels of decorative paper are 5 ¼ x 1 7/8.
a. Adhere the two panels to the front of
the card.
3. The inside
center panel is:
a. Decorative paper (coordinating design)
– 4 x 5 ¼.
4. The inside
mounted panel is:
a. Colored card stock – 3 x 5 ½
b. Decorative paper – 2 ¾ x 5 ¼
c. Adhere them together.
d. Using a 2 ½ round punch or die, cut a
circle in the middle of the panel.
e. Lay aside.
5. The
shutter: 2 pieces of colored card stock
3 ½ x 4.
a. At one end score at ½. This will make the scored off section measure
3 ½ x ½ .
b. At the opposite 3 ½ end, make a pencil
mark on the edge at the center – 1 ¾ .
c. Make another mark 2” above the first
mark.
d. Cut from each corner end to the 2”
mark, making a big “V” shape.
e. With the “V” shapes facing each other,
fold the ½” scored section
toward
the back on both pieces.
ß 4” à
__________________
| . |
|
. ß2”à | á
|1/2 . .________.|
3 ½ “
|
. | â
|
. |
|_________________ |
f. Place
Score Tape on the end of the scored sections.
g. Place the folded panels just outside
the centerfolds of the card, left and
right, align the
shutter
pieces across the top and bottom, then remove tape and adhere in place.
h. On the left shutter piece, snip about
¼” off both points. The left
shutter overlaps the
right shutter.
6. On a 2 ½ x 2
½ piece of coordinating decorative paper or card stock, stamp a very small
sentiment. With the
card laying open and the shutter flaps overlapping, you can see the size
of the
space for a sentiment.
7. Use 4
dimensionals to stick the panel to the center of the card.
a. Be sure to place the dimensionals one
at each top corner of panel.
b. Adhere the panel over the two shutter
pieces.
c. Adhere an anchor charm to the right
bottom of the panel as shown.
8. Two Side
panels inside the card: Colored Card
stock 1 ¼ x 5 1/2
Decorative paper 1 x 5 ¼
9. Belly Band –
1 x 11”
a. Place the right end of the band at the
front of the card at the right edge.
b. On the left edge of the card, fold the
band around the back and to the front, placing
the end underneath
the previous piece of the bank.
c. Glue or DS tape in place.
d. Cut a notch in the showing right end.
10. Belly Band Embellishment Option 1:
a. Punch or die cut a 2 ½” circle from
card stock.
b. Stamp a sentiment on it and attach to
center of belly band.
Stamps: Our
Daily Bread Design The Waves of the Sea
Die: Nesting
Circles (Lifestyle Crafts, the 2 ½ “ circle) or you can use a 2
½ “ punch.
11. Belly Band Embellishment Option 2:
a. Cut one each:
Light
colored card stock 1 ¾ x 2 ¼
Coordinating
colored card stock 2 x 2 ½
b. Stamp the Fish Net image on the 1 ¾ x 2
¼ card stock (I used Antique Linen Distress
Ink).
c. Distress the edges with Memories
Midnight Blue.
d. Over stamp with the anchor image using
Memories Midnight Blue.
e. Layer this piece onto the colored card
stock piece.
f. Adhere it to the center of the bellyband.
Stamps: Anchor
(dragonflylaser.com); Happy Birthday (Stampin’ Up); Fish Net
Background
(Our Daily Bread)
Die: Nesting
Circles (Lifestyle Crafts, the 2 ½ “ circle) or you can use a 2 ½ “ punch.
Hopefully the instructions are clear. However, if you have a problem, please contact me. I'm more than happy to answer questions.
Blessings,
Annie


No comments:
Post a Comment