Thursday, June 25, 2020

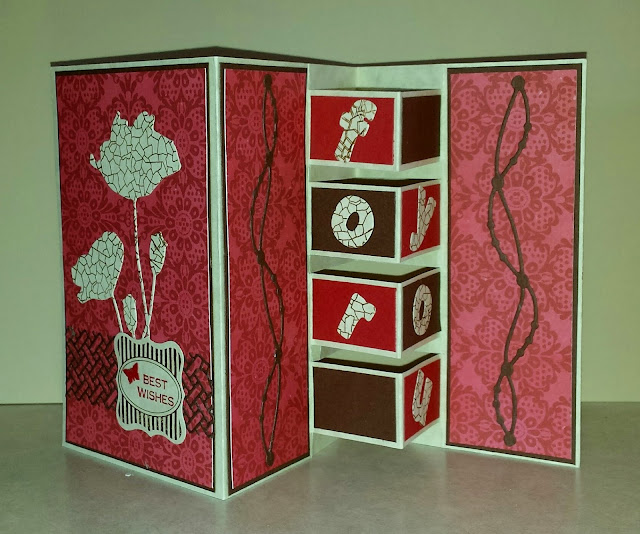
Poppy Building Block Card


Annie’s Ink-Lings


I love poppies and really have a hard time resisting the urge to purchase another poppy stamp or die.  My card today features one of my favorite poppy dies -- in red, of course.  The instructions are lengthy, but in case this is your first time making a Building Block card, I attempted to list each step to make it easier for you to put together.  A template for cutting and scoring is included.  Here are a couple of pictures of the card: front and inside.

The crackle lines on the poppies were created by stamping on the die cut
with the stamp listed below.

I also used the same stamp on the letters.


This is a fun card to make and I hope you will give it a try.  Everything you
need is listed below, but be sure to let me know if you have any questions.

Card Stock:  Cream, Red, Brown
Red Pattern Decorative Paper

Dies:  Field of Dreams #51-030 by Penny Black; Wicker Panel #98984 by Memory Box; an element die from the Ribbons and Jewels set #1070 by Elizabeth Craft Designs, and letters from the Lawn Fawn set #LF490
Ink Pads:  Distress Ink – Vintage Photo and Barn Door
Stamps:  Stampin’ Up:  label stamp and punch; Best Wishes stamp;
Magenta Crackle Stamp #18082-I

Tools
Big Shot, Paper Trimmer, Glue Bottle, Ruler and Pencil, Tape Runner, Bone Folder, Tiny Butterfly Punch

Cutting, Scoring, and Folding
1.  Cut a 5 ½ x 10 ½ inch card base.
2.  Score the card base on the long side at 3-½ and 7 inches.
3.  Fold the left score line into a mountain fold and fold the right score line into a valley fold.
4.  Close the valley fold.
5.  At the folded over edge at the right side, measure 1-½ inches from the fold and place a pencil dot.  Do the same at the bottom of the card.
6.  Lightly draw a line connecting the dots.
7.  Place the folded section at the top of your paper cutter, then cut along the fold at 3/8  *  1-3/8     *  1-5/8  *  2-5/8 * 2-7/8  * 3-7/8 * 4-1/8 *  5-1/8  inches.
8.  The slits you have cut are 1 inch.  Using your scoring tool, score at both sides of the 1 inch slits.  These will be mountain folds.
9.  The ¼ inch slits will be valley folds.  
10. Fold and use a bone folder to make sure the folds are nice and sharp.
11. Cut 4 blocks in red and 4 blocks in brown CS:  1-3/8” x 7/8”.
12. Cut from brown CS 1 panel 3-3/8” x 5-3/8” and 2 panels 1-7/8” x 5-3/8”.
13. Cut from DP 1 panel 3-1/4” x 5-1/4” and 2 panels 1-3/4” x 5-`1/4”.

Die Cutting
1.  Die cut the flowers and letters from cream CS. 
2.  From brown CS die cut the lattice and 2 elements.

Stamping
1.  Stamp the flowers and the letters with Distress Vintage Photo ink pad using a crackle stamp. 
2.  Using the label stamp from Stampin’ Up, stamp with Distress Vintage Photo ink pad on cream CS and punch with the coordinating SU label punch.
3.  Using the SU Best Wishes stamp, stamp on the label using Distress Barn Door ink pad.
4.  Punch a tiny butterfly from red card stock and glue it to the label.

Decorating
1.  Layer the red panels onto the brown panels, then onto the card base as shown in the sample card.
2.  Glue the flowers in place, followed by gluing the wicker panel over the flower stems, glue the label in place, and glue a tiny red butterfly onto the label.
3.  Glue an element onto each side panel.
4.  For the building blocks, glue alternating red and brown panels to the card base blocks.
5.  On the left row of building block, starting at the top, glue the “f,” “o,” and “r” in place.
6.  On the right row of building blocks, skip the first block and start with the second block gluing on the “y,” “o,” and “u.”

Wishing you days of happy stamping!

Blessings,
Annie


Sunday, June 21, 2020

Bible Illustrating and Journaling - Luke 1:35


Annie’s Ink-Lings


The Holy Spirit will come upon you, and the power of the Most High 
will overshadow you.  So the baby born to you will be holy, and 
He will be called the Son of God.
Luke 1:35

I had one of those "aha" moments during my bible study the other day.  Do you remember the old hymn that says, "What can wash away my sin? Nothing but the blood of Jesus." We know that when Jesus shed his blood on the cross, He paid the ultimate sacrifice for our sins. We know that He is God's one and only Son, and that all His life He was holy and pure, just the same as His heavenly Father. But . . . did you ever consider all the other details that made the blood of Jesus different? If you will bear with me, we're going to have a little biology lesson.
"Although a fetus gets its nutrients from, and grows in the placenta of its mother, it never takes a single drop of the mother's blood because at the moment of conception it begins the process of producing its own blood supply, which is genetically influenced by the blood of the father. Therefore, only One born of a virgin would have blood untainted by humanity. These is only One Man who has been born of a virgin: Jesus Christ." (Jon Courson's Study Bible.)

That is so amazing! I'm so thankful that God keeps bringing enlightenment to me as I study the bible.  

This is a tip-in that I made for my Inspire Bible.


I dearly love starting everyday with bible study.  There isn't a better way to start the day -- in my humble opinion. 💖

Blessings,
Annie


Monday, June 15, 2020

Cylinder Pop-Up Card


Annie’s Ink-Lings


My, oh, my, have I got a fun card for you!  Besides being a style that is a first-time-ever for me, it is really an adorable owl card.  Who-who doesn’t like owls!  I saw a picture on Pinterest, but was very disappointed when I found there were no directions included in the posted link.  It took me forever to figure out how to make it.  Fortunately, with a little help from a video on YouTube, in centimeters and a much bigger card, I finally was able to draw a diagram, determine my measurements, and fit it all together.  Whew – what a challenge!  One of the things that is really fun about this card is the cylinder mechanism. The mechanism pattern is included in this post.  Hopefully, you will find it easy to make even though it takes a bit of time.  See what you think.


The blue leaf is embossed.  It makes a nice contrast to the plaid leaf.  The metal spiral paperclip really shows up on the ribbon.  I used a glue dot to hold the paperclip in place.


This is the pattern for the mechanism that makes the tree trunk pop up.  When you fold back on the score lines, the long pull strip crosses over the back side and will fit in the cutout on the left side of the trunk.


Brown Card Stock
Base – 8-1/2” x 6-1/2”
           Small Panel – 3-5/8” x 2-1/2” for embossing
Small Panel – 2-1/2” x 2-1/2” for behind tree trunk
Brown Trunk Panel – 5” x 3-1/2”
Blue Card Stock
Blue Panel – 6” x 3-7/8” – for Card Front
Blue Panel – 3” x 2” – for embossing (inside)
White Card Stock
Mechanism Panel – 9” x 5”
Small Panel for Card Front – 3-5/8” x 3-1/4”
Small Panel for Sentiment – 2-1/2” x 1-1/2”
Panels for Inside Card (cut 2) – 6-1/4” x 4-1/8”
Embossing Folders
Stampin’ Up Square Lattice
Tim Holtz/Sizzix Woodgrain
Punches
Stampin’ Up 3 Leaves
Stampin’ Up Bird Builder
Dies
Impression Obsession Leaves Dies DIE030-S
Karen Burniston #1027 Word Set
Lifestyle Nesting Circles #L-CC-001 –  the 1-1/4” die
Stamps
Great Impressions “Peeking Out” B197
Other Supplies
Distress Ink Pad Gathered Twigs, Tape Runner, ½” Score Tape, 
Foam Tape, Regular Tape, Glue Pen, 6” Blue Ribbon, Spiral Paperclip,
Glue Dots
Tools
           Stampin’ Up Take Your Pick Tool, Scissors, Paper Trimmer, Big Shot

A Few Notes
Fold mechanism on score lines.  With the folds in place, ink edges of panel with Gathered Twigs to cover up the white edges.  Cover the front of the mechanism panel with DS tape on all edges and several rows in between.  Adhere the brown embossed panel onto the white mechanism panel.

Once the white mechanism panel and the tree trunk panel are adhered together, die cut a 1-1/4” circle about ¼” above the pull tab.  Roll/curve the panel to soften it and make it popup more easily when the card is opened.

Use Foam Tape to adhere the sentiment panel on the inside of the card.

I hope you have fun with this card style.  Let me know if I can help you in any way.
Blessings,
Annie


Thursday, June 11, 2020

Diagonal Split Panel Card - Modified


Annie’s Ink-Lings


Hello stampers,

Sympathy cards are not one of those fun cards to make, and especially on a overcast and dreary day like today.  But they are definitely needed and good to have on hand when one of those sad occasions occur in life.  As the librarian for my church and as a card maker, I supply and have available all-occasion cards for my church family.  However, sadly, this one is for me to send to my very dear friend whose husband passed away from cancer a few days ago.  I decided to share it with you as an idea in case you want to make one to have on hand.  Of course, this design can be used for any occasion by just changing the sentiment.

I call this a modified diagonal split panel card because the middle diagonal piece is not discarded but layered between the two 3-D diagonal panels.  You can omit the middle panel entirely and stamp a sentiment there instead for a different look.  I really like these colors together.


Directions
          Card Base:   8-½ ″ x 5-½ ″ white card stock
          Bottom Layer Patterned Paper:  4-1/4″ x 5-1/2″
          Coordinating Top Layer Patterned Paper:   4-1/4″ x 5-1/2″

1.  Glue the bottom layer patterned paper to the front of the card front.

2.  Working on the Top Layer Patterned Paper, mark in pencil 1-1/4″ to the left of the bottom right corner, and 2-1/2″ above the bottom right corner. Trim from the top left corner to these marks, then erase the marks. Discard the center piece or lay aside if you want to use it in center of the split.


3.  Attach the two outside diagonal pieces with foam tape.

4.  Your choice to do this step:  With the leftover center diagonal cut put DS tape on the back.  Center and slide the small tip up under the flower image.  Match patterns if there are any.  Cut off excess.

5.  Stamp image, color, cut out, and attach to card at top left.  For the 
          inside leaves: color all of them all over with Apple Green.  Shade half 
         of each leaf with Dark Green.

6.  In the center of each flower, put a drop of Buttermilk Gloss Crystal
         Drops.

Supplies
          Stampin’ Up Wonderful Romance stamp set and coordinating
                   Stamping’ Up Wonderful Floral Framelits Dies
          The Stamps of Life:  Sympathy 2 stamp set, X001Y8FYYF
          Tape Runner
          Foam Tape
          Glue Pen
          Fussy Cutting Scissors
          Paper Trimmer
          EK Success Label Punch
          Colored Pencils:  Canary Yellow, Light Aqua, Cobalt Turquoise,
                    Apple Green, Dark Green, Germany Blender
          Ruler
          Pencil
            Buttermilk Gloss Crystal Drops
         Black Permanent Ink Pad

Well, that's it for today.  Thanks for viewing my post.

Blessings,
Annie


Monday, June 8, 2020

Bible Illustrating and Journaling - Matthew 10:28-31


Annie’s Ink-Lings


Do not be afraid.  
Matthew 10:28-31


In this time of uncertainty, there is hope.  Even with all the horrible things going on in this world that threaten, hurt or kill us, there is hope.  God alone should be our fear and dread.  For He is the One that can destroy our body and soul in hell.  The good news is God provided a way to avoid living in anxiety through Jesus, His Son.  Believe in the Lord Jesus Christ, the Son of God, and commit your life to Him and you will have no reason to fear the future.

28 “Don’t be afraid of those who want to kill your body; 
they  cannot  touch your soul. Fear only God, who 
can destroy  both soul and body  in hell.  29 What is 
the price of two sparrows—one copper coin? But 
not a single sparrow can fall to the ground without 
your Father knowing it.  30 And the very hairs on your 
head are all numbered.  31 So don’t be afraid; 
you are more valuable to God than 
a whole flock of sparrows. 

May you be filled with peace in the days ahead.
Blessings,
Annie


Monday, June 1, 2020

Graduation Center Step Card


Annie’s Ink-Lings


June is here and it is time for a graduation card!  A sweet young lady from my church is graduating this coming Friday.  She loves cats probably just about as much as I do.  So of course, I know she will love a cat themed card and it would be great fun to make.  And who doesn't love balloons!  Her school colors are red and blue - a nice color combination.  I decided to make a center step card, size A2.  I’m really happy with the way it turned out.  I may have to make one for myself because of the kitties. ðŸ˜» 

Notice how the cap is just a bit crooked on the kitty's head.  Hard to keep it in place floating around with a bunch of balloons.


Here's a picture of the inside of the card.  Love the sentiment!


You will find a cutting and scoring template at the end of this post.

Measurements
White 11 x 4¼ Card Base
Center Panel R Red 2-1/8 x 4-3/8
Center Panel Designer Paper 2 x 4¼
Side Panels, cut 2 of Red 4-3/8 x 7/8
Side Panels, cut 2 of Designer Paper 4¼ x ¾
Bottom Panel, Red 4¼ x 7/8 

Stamps
Honey Bee Stamp Set Oh My Whiskers #HBST-161
Stampers Anonymous Tim Holtz Stamp Set Crazy Things #CMS237
Kelly Creates Celebration Traceable Stamps #13847102
Copic Markers:  R29 Lipstick Red; B14 Light Blue; R81 Rose Pink;
N1 Natural Grey No. 1

Template A2 Card
Hope you've enjoyed today's card.
Blessings,
Annie