Annie’s Ink-Lings

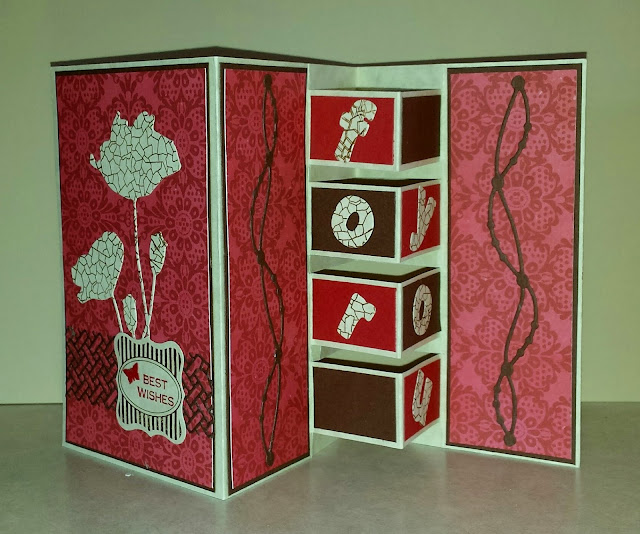
I love poppies and really have a hard time resisting the urge to purchase another poppy stamp or die. My card today features one of my favorite poppy dies -- in red, of course. The instructions are lengthy, but in case this is your first time making a Building Block card, I attempted to list each step to make it easier for you to put together. A template for cutting and scoring is included. Here are a couple of pictures of the card: front and inside.
The crackle lines on the poppies were created by stamping on the die cut
with the stamp listed below.
I also used the same stamp on the letters.
This is a fun card to make and I hope you will give it a try. Everything you
need is listed below, but be sure to let me know if you have any questions.
Card Stock: Cream, Red, Brown
Red Pattern Decorative Paper
Dies: Field of Dreams #51-030 by Penny Black;
Wicker Panel #98984 by Memory Box; an element die from the Ribbons and Jewels set #1070 by
Elizabeth Craft Designs, and letters from the Lawn Fawn set #LF490
Ink Pads: Distress Ink – Vintage Photo and Barn Door
Stamps: Stampin’ Up: label stamp and punch; Best Wishes stamp;
Magenta Crackle Stamp
#18082-I
Tools
Big Shot, Paper Trimmer, Glue
Bottle, Ruler and Pencil, Tape Runner, Bone Folder,
Cutting, Scoring, and
Folding
1. Cut a 5 ½ x 10 ½ inch card base.
2. Score the card base on the long side at 3-½
and 7 inches.
3. Fold the left score line into a mountain fold
and fold the right score line into a valley fold.
4. Close the valley fold.
5. At the folded over edge at the right side,
measure 1-½ inches from the fold and place a pencil dot. Do the
same at the bottom of the card.
6. Lightly draw a line connecting the dots.
7. Place the folded section at the top of your
paper cutter, then cut along the fold at 3/8
* 1-3/8 * 1-5/8 * 2-5/8 * 2-7/8
* 3-7/8 * 4-1/8 * 5-1/8 inches.
8. The slits you have cut are 1 inch. Using your scoring tool, score at both sides
of the 1 inch slits. These will be
mountain folds.
9. The ¼ inch slits will be valley folds.
10. Fold and use a bone
folder to make sure the folds are nice and sharp.
11. Cut 4 blocks in red and 4
blocks in brown CS: 1-3/8” x 7/8”.
12. Cut from brown CS 1 panel
3-3/8” x 5-3/8” and 2 panels 1-7/8” x 5-3/8”.
13. Cut from DP 1 panel 3-1/4”
x 5-1/4” and 2 panels 1-3/4” x 5-`1/4”.
Die Cutting
1. Die cut the flowers and letters from cream CS.
2. From brown CS die cut the lattice and 2
elements.
Stamping
1. Stamp the flowers and the letters with Distress
Vintage Photo ink pad using a crackle stamp.
2. Using the label stamp from Stampin’ Up, stamp
with Distress Vintage Photo ink pad on cream CS and punch with the coordinating SU
label punch.
3. Using the SU Best Wishes stamp, stamp on the
label using Distress Barn Door ink pad.
4. Punch a tiny butterfly from red card stock
and glue it to the label.
Decorating
1. Layer the red panels onto the brown panels,
then onto the card base as shown in the sample card.
2. Glue the flowers in place, followed by gluing
the wicker panel over the flower stems, glue the label in
place, and glue a tiny red butterfly onto the label.
3. Glue an element onto each side panel.
4. For the building blocks, glue alternating red
and brown panels to the card base blocks.
5. On the left row of building block, starting
at the top, glue the “f,” “o,” and “r” in place.
6. On the right row of building blocks, skip the
first block and start with the second block gluing on the “y,” “o,” and “u.”
Wishing you days of happy stamping!
Blessings,
Annie


No comments:
Post a Comment