Saturday, June 14, 2014

Fluttering Butterflies

What a beautiful day outside! 
I could hardly bring myself inside but for the fact that I needed to be out of the sun for a while and cool off.  So while I'm having an iced drink and dropping my body temperature, I'll share a couple of cards that I taught in my class this week.    They are basically the same except for the color selection of the butterflies for each card.


These are clean and simple cards, but still have a touch of elegance to them, and are really fun to make.  I think it must be the butterfly effect.  I love, love, love butterflies - can't resist them.  Really, it's almost as bad as my craving for chocolate! 
 
So, here are a few card details in case you would like to make one.  Have fun!
 
Black CS - 5 1/2x 4 1/4  -  cut one
White CS 4 12 x 3 12   -  cut two, one for outside & inside
Gold glossy CS
Various colors of pattern paper
 
Dies:  Technique Tuesday "Hello"; QuicKutz "Nesting Ovals"
 
Punches:  Several sizes of Martha Stewart Butterflies or whatever brand you have;
All Night Media "Small Butterfly"
 
Add a butterfly to the inside of the card on the white paper.
 
 Uhmm, time to go check my flower garden for butterflies. 'Bye for now!

Tuesday, June 10, 2014

Embossing on Patterned Paper


Hello again!
Are you ready to try something different?  Let me share with you some of the fun things that have been going on around here.
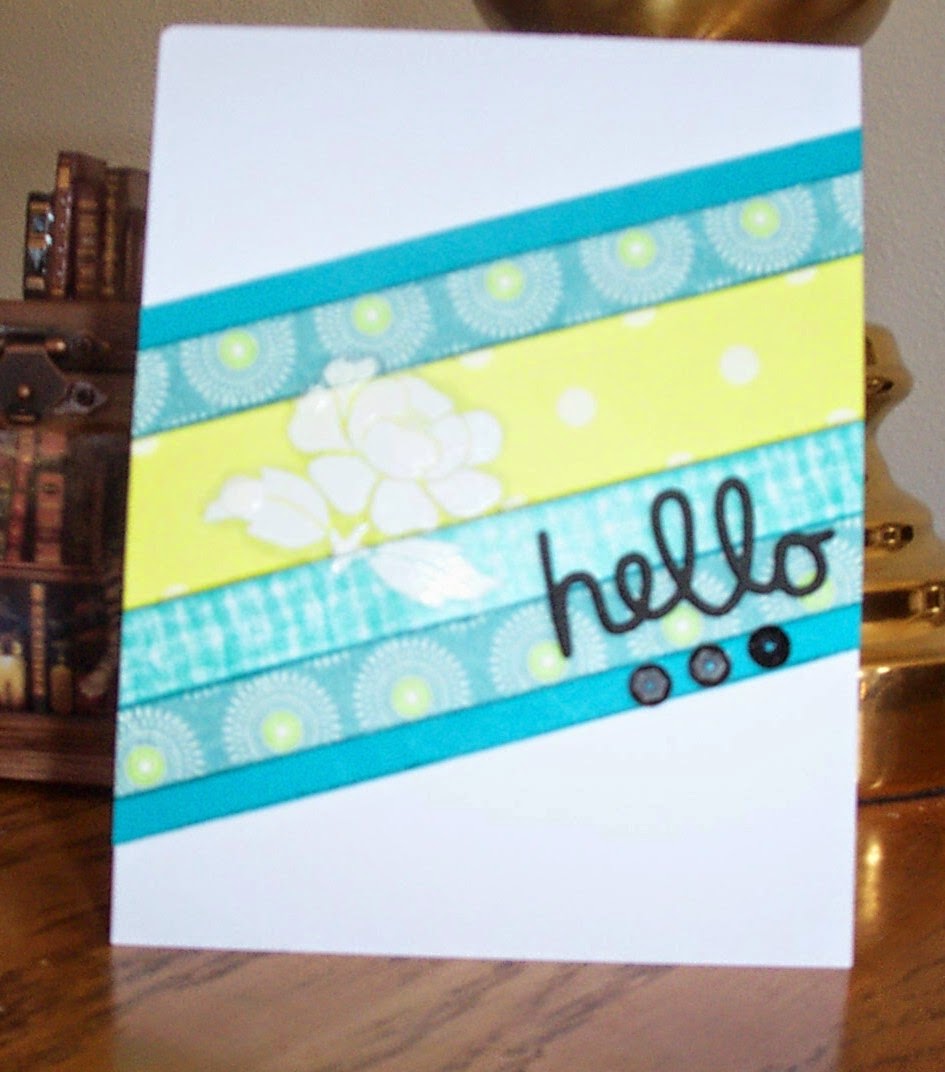
During card making with some of my friends this afternoon, the card pictured is one of the cards we made.  I cased the basic idea from Jennifer McQuire, but made a few changes in the layout.  Three tips that I learned from Jennifer are:  (1) to distress both edges of each strip; (2) emboss an image on patterned card stock; and (3) to outline the embossed image with a grey Copic marker which made the white image stand out a bit more.

While browsing at Craft Warehouse last week, I discovered foam sheets with a self-adhesive backing.  How cool is that!  I die cut the "hello" from a black sheet of it.  Just loved the result!  Now it's my new favorite thing.  The foam cuts very nicely and provided a nice dimensional word.  Now it's your turn and all the information you need is included below.  Have fun!

Finished Card Size:  4 ¼ x 5 ½ top folded.


Cut:   white card stock for card - 11 x 4 ¼
          small piece of white card stock - 5 ½ x 3
          2 solid color strips – 5 ½ x ¼
          1 patterned card stock - 5 ½ x ½
          2 strips -  use different patterned card stock for each one- 5½ x ½
          1 strip with pattern different from first 2 – 5 ½ x 1

All strips should be of coordinating colors.

 Die Cut:  the word “Hello” from black self-adhesive foam sheet.  Alternatively, you can use regular black card stock and glue the word onto the card.  (Technique Tuesday die)

1.              Score and fold your card, and set aside.

2.              Use distress ink on the sides of all strips.  For the colors of the card stock that I chose, I used Tim Holtz Peacock Feathers and Shabby Shutters.

3.               Now we will work on the strip of white card stock.  Use adhesive along all sides and then several times on the body of the strip.

4.              Begin layering the strips according to the card sample or make your own design.

5.              Be sure to snuggle them up tight against one another.

6.              Using adhesive, diagonally layer the striped piece to the card

7.              Trim the excess off both sides of the card.

8.              The next step is to emboss the flower stamp over the patterned strips.

9.              Be sure to use an Embossing Buddy first in order to keep excess embossing powder from sticking to the card stock.

10.          After embossing with white embossing powder, use a tiny brush to remove any powder that may be left on the piece.

11.          To make the white flower stand out a little more, lightly trace around it using a grey Copic marker.  I used #N1, neutral grey.

12.          Last step – peel the backing off the word and stick onto the striped piece, then glue 3 black sequins under the word. (Doodlebug Designs sequins pack)

Friday, June 6, 2014

The Magic of Red Dragonflies!

Hello stamping friends,

Finally, I had time to make a screen card.  I've been ogling them on Pinterest and Face Book and YouTube, so at last I got organized and made one, and now I want to share it with you.


This color combination is one of my favorites.  It's easy on the eyes and seems restful to me, even with the red dragonflies.  

The measurements are:  Card:  11" x 6 1/2"; Panels:  4 1/2" x 2 1/2"

 1.  Cut the black card stock to size.
 2.  Use a decorative border punch across the top.
 3.  Score the black card stock at 2 3/4", 5 1/2", and 8 1/4".
 4.  Punch the legs using the Stampin' Up label punch.
 5.  Score across the top of the card just below the punched border, about 1/8", then
      score across again below the first score line.
 6.  Score across the bottom of the card just above the punched legs, about 1/8", then
      score again above that score line.
 7.  Fold your card - mountain, valley, mountain.
 8.  Cut the panels from decorative scrapbook paper or card stock.
 9.  Layer the panels in place, centering between the upper and lower score lines.
 10.  Next, add the flowers and words.  I glued them on using Aleene's Tacky Glue,
        fast drying glue pen.
 11.  Finally, punch the bow and dragonflies from red card stock and glue in place.

The card was much easier to make than I anticipated.  Once I decided on the color combination and decorative paper, and finished with all of the die cutting, the card went together in about 10-15 minutes.  Now go have fun and make one for yourself!


Dies Used:
Impression Obsession Hollyhocks
Memory Box Fresh Daisies
Memory Box Meadow Rue
Sizzix Sizzlits Happy Birthday

Punches:
McGill Bow and Tiny Dragonfly
       Stampin' Up Label Punch
Martha Stewart Bubble Bath


Thursday, May 22, 2014

Sisterchicks in Gondolas, by Robin Jones Gunn

So here we are, another set of Sisterchicks off to Italy this time. Jenna has been invited to cook for a small retreat group, with airfare and lodging included and a free ticket for a friend – unbelievably in Venice!  Having been on her own since her husband walked out on her when their daughter was only 3 month old, and now with her daughter grown and out of the nest, Jenna felt this was the perfect opportunity to get a fresh start in her life.  Of course the perfect companion for this trip would be her best friend sister-in-law, Sue, who only required a small amount of coaxing to accept Jenna’s invitation.  For the last couple of years Sue had been caring for her husband and helping him to recover from a serious auto accident that had left him paralyzed.  Sue really needed a retreat of her own to help her get over her anger at God for letting this happened to her husband.
With only a few Italian words between them, I found their attempts at communication with the shopkeepers to be hilariously funny.  I loved their goal of eating a new flavor of gelato everyday.  Yum!  With all the shopping, sightseeing, riding in gondolas, and exploring the city, I’m surprised that Jenna and Sue were still able to find time to do the grocery shopping and cooking for the conference.
As the women spent more time together, they were able to open up and share about their past hurts and unpleasant experiences.  They found that they were being drawn into a deeper relationship with God and the bond between them was growing ever stronger.  A healing had begun and they realized that God was not done with them yet.  A bright future was waiting for them.  Yes, God does answer prayer.
I love this definition,  “SISTERCHICK n.: a friend who shares the deepest wonders of your heart, loves you like a sister, and provides a reality check when you’re being a brat.”
One of the reasons I like the Sisterchicks books so much is because they remind me of the escapades of my two sisters and me and all the fun we have when we get together.  And also because God is woven throughout the stories and there’s always a message that points us to Him and how to apply it to our lives.

I received this book for free from WaterBrook Multnomah Publishing Group for this review.

Wednesday, May 21, 2014

Persecuted, I will not be Silent! by Robin Parrish


As John Luther ran in blind panic through the woods, desperately trying to get away from the men who abducted him, he couldn’t believe this was really happening to him.  It didn’t make sense; what did they want with a preacher, a God-fearing, peace-loving man with a wife and a daughter, devoted to teaching the truth of God’s word.  Who would want to harm the man who was considered the most popular evangelist of his day?  Barely stopped to catch his breath, he suddenly doubled over, coughing and gagging, and threw up on the ground.  His body was sluggish, his brain foggy.  He knew he had been injected with some kind of drug.  Then suddenly he sank into darkness.

It was in all the news – John had been charged with the rape and murder of a young teenage girl.  Horrified by the filth the media was saying about him, John knew that somehow he must prove his innocence and find out who had set him up, who was framing him.  Thinking that it couldn’t get any worse, John found that he was wrong.

The strain of evading both the police and the men persecuting him was taking its toll, but at least he had discovered the reason for his life being turned upside down.  John had refused to lend his support of a new religious-equality bill for which his senator friend had been pressing him.  And his endorsement was critical.  Was the senator the mastermind behind this plot or did it go higher up – as far as the White House?

I love to read suspense novels and this one did not disappoint every bit as suspenseful as a John Grisham book.  This is the first book I’ve read by Robin Parrish and the first present-age religious persecution story I’ve read.  It was well written, moved quickly, and stayed suspenseful until the very end.  I look forward to reading more of this author’s books.

Bethany House Publishers provided this book to me for free in exchange for an honest review.

Sunday, March 16, 2014

Love That Chocolate Dipped!

Hi friends,
I want to share with you about a little surprise I found while shopping at my local Bi-Mart.  The store actually doesn't carry much in the way of stamping/scrapping supplies, but I always stroll by that section just in case there might be something new and interesting.  I'm not much of a card kit person, but this kit was on sale for such a low price that I couldn't resist the purchase of it.  The kit is called, "Chocolate Dipped Artful Card Kit," by Hot Off the Press, Inc.  The custom designed paper is very pretty and colorful.  And all the die-cuts and cut-outs are well designed in interesting shapes -- made me really want to use them instead of tossing in the waste can.  You can learn more about the kit by clicking on the above link.  I posted this particular link just so you would have a quick way to see what the kit looks like.  I'm sure there are many places online where you can purchase it if you're interested.

So here are the cards that I've made so far with this kit and I still have oodles of paper left to make more.  I'm really happy that I took a chance on this one!


As always - wishing you happy stamping,
Annie

Friday, February 14, 2014

Playing with My New Toy

I know it's only February, but spring is calling me.  How about you?  One of Memory Box's new dies is the Bella Bouquet which just "spoke" to me with its feminine daintiness.  Naturally, I placed an order and it arrived this week.  Yahoo!  Finally, today I had time to make a birthday card for a friend using the die and a Martha Stewart edge punch.  I have to admit that it took me a while to figure out how to make the border corners match - close enough anyway. I need more practice for sure.  Here's how it turned out:


The double bow was made using the Bow-Easy, a really handy little bow-making tool.  It makes 7 different sizes of bows - lots of good sizes.  What I like most about it is the way the knot looks . . . flat . . . and the end ribbons hang evenly and nicely from the back.  The little white sentiment card was trimmed with the Fiskars Mini-Pinking scissors - the old-fashioned way. (;    It's layered on a piece of forest green card stock the same as the flower stems.  Well, that's it for today.  Now, out of the studio and back to the kitchen.
Wishing you a blessed day,
Annie

Thursday, November 14, 2013

Holiday Cards Day 1

Hi stamping friends,

Another fun day in the studio busily creating the cards that were in Monday's class on the 11th.  The instructors for that day were Kristina Werner, Jennifer McGuire, Joy Taylor, and Tami Hartley.  These gals have done a wonderful job - not only in their designs, but also by providing supply lists, easy-to-follow directions, and lots of tips.  And on top of that there are videos and downloadable PDF files if you want to store the instructions on your computer.

So, enough chit chat, take a look at these fun designs.


This was a fun card to do.  It was embossed on top and bottom, leaving a flat surface in between to stamp the sentiment on.  By the side of each strip of washi tape, you can see the stitching using a white pen.  Inside there is a gift card pocket made of vellum and decorated with washi tape.


A fun and easy card to make.  It is a Z fold card.  When you pull out the left panel, you can see that the whole card is stamped with a holiday greetings stamp.  Also, a nice surprise here, the banner stretches all the way from the right side of the card to the left, the left end being covered by the Christmas tree.  It makes me smile!


Red and white is always striking to me.  Since I didn't have the falling snowflake template that the design called for, I had to be creative and find a substitute.  I used a small hand punch and my eyelet tool to punch the holes.  Sometimes, you just have to go with what you've got.  The other thing I like about this card is that the label is made with three shades of red.  Very pretty!  I'm looking forward to using this technique with other colors.


Just love this card.  It is so soft and delicate looking.  I masked triangles and then alternately sponged three shades of blue ink.  Distress stain was lightly washed over the card, followed by stamping with white ink using a speckled spot stamp.  The layered snowflake was sprayed with glimmer mist.  I'm a happy stamper to have learned how to use these products together.

Until next time,
Annie


Wednesday, November 13, 2013

Online Holiday Card Class - Day 2

Having great fun making cards with teachers Jennifer McGuire, Laura Bassen, Kristina Werner, and Debbie Hughes today.  There were six card today, but I have finished only four so far.  Maybe you can get a few ideas for your own Christmas cards.

This is a layered die cut inlay card and a brand new technique to me.  It is perfectly smooth on the card front.


This card features an acetate window frame.  The window frame opens separately from the card and has embossed snowflakes adhered front and back of the acetate.  A really cool  idea.

Here, you see the use of negative and positive die cuts of snowflakes.  The second snow hill is mounted and sits up above the snowflake behind it.  The snowflakes are covered with Vintage Glass Glitter.  It's really a pretty card but this picture doesn't do it justice.

Plain and simple, yet quite striking in red and white, featuring a white wood grain label, saddle stitch ribbon, and die cut poinsettia.

Now I need to get Monday's class cards made and then get ready for the Friday class.  We have classes on Monday, Wednesday, and Friday of next week, too.  Oh, the joy of card making!

Blessings,
Annie

Wednesday, August 21, 2013

Live the Virtues


Hi there, friends,

Recently I hosted a swap of pages for a  "Virtues Book."  Each participant chose a virtue and illustrated the chosen virtue on a 4 1/4" x 5 1/2" card stock page - front and back, and then decorated and embellished it.  We each designed our own cover and chose our own binding method.  I used my Paper Drill to drill a hole in the upper left-hand corner, then  fastened it together with a metal binder ring.  Finally, I added several black and colorful yellow ribbons to the metal ring.  This darling little book is  now displayed on my coffee table.  I love doing collaborative projects because they showcase so many styles of personal creativeness -- always a delight to see.  This beautiful little book will be wonderful for times of meditation, to sit and reflect on the meaning of each virtue and how Jesus teaches us to seek them and let them become a part of who we are.  I like, too, that it will be a constant reminder of how God is molding me to be more Christ-like in my character.  Best of all is, and it's no accident I'm sure, that I'm always finding my dear Lord right in the middle of my paper crafts hobby.  Awesome and all to His glory!!!
Hope you enjoy looking at our book. 
Blessings.
Annie

OK, time for the show to start - enjoy.


Title Page
Virtues Poem


Tranquility - Lisa Barber (Front)


Tranquility - Lisa Barber (Back)


Carol Cone - Courage (Front)
Carol Cone - Courage (Back)


Joy - Mary Darnell (Back)
Joy - Mary Darnell (Front)


Patience - Peg Waldron (Front)
Peg Waldron - Patience (Back)


Kindness - Phyllis Schaffer (Front)
Kindness - Phyllis Schaffer (Back)


Forbearance - Ronnie Lorenz (Front & Back)

Charity - Ann Lancaster (Front)
Charity - Ann Lancaster (Back)

Monday, July 8, 2013

Envelopes Galore!

We R Memory Keepers - Envelope Punch Board
My newest tool purchase was this Envelope Punch
Board by We R Memory Keepers.  Ooooh, I love it!  I'm confessing that a problem I have is to just jump right in and try to use a tool before I've read the directions with understanding.  Well . . . it was only one line that I missed when skimming over the directions; however, it was an important one.  So I only messed up two times before my friend Sharon stepped in to see why I was having difficulty.  In the blink of an eye, she quickly spotted what I was doing wrong and set me on the road to successfully punching out envelopes.  It was so fun that I couldn't stop!  Really! 

To start with, I used some 12x12 scrapbook paper that I had purchased on sale for $.10 a sheet.  Next time I'll delve into some of my special papers.  I used the scraps from the 12x12 sheets to make the matching cards.  Here's a link to a video tutorial (that I found after the fact):   http://store.scrapbook.com/wr-71277-0.html  And for a bit of inspiration, here are a few sets that I've made:


  A variety set of 6 would make a great little gift and you could make and embellish a little box to hold them.  To make boxes I use Aleene's Box Maker, another great little tool.  Wishing you lots of fun with your paper arts and may God bless you,
Annie

Wednesday, June 19, 2013

Twelve Unlikely Heroes

I was captivated by “Twelve Unlikely Heroes,”  written by John MacArthur.  He painted such vivid portraits of people in “Twelve Ordinary Men” and “Twelve Extraordinary Women,” so I was really looking forward to reading this book.  Once again he has captured the essence of twelve people in the Bible whom God chose to use to accomplish His purposes.  At first glance, they seem anything but heroes, but who today could walk 300 years with God and please Him everyday.  “As a saved man, Enoch’s life was characterized not by harsh legalism but by the joy of intimate communication with his Creator.”  Wow, that is so awesome! 

Looking at Joseph, we see that he grew up in an environment of family tension and strife.  Joseph was spoiled by his mother and was his father’s favorite son.  When his mother passed away Joseph’s brothers began to treat him with hostility and resentment.  And it certainly didn’t help matters when his father Jacob sent Joseph to spy on his brothers to make sure they were doing their work properly.  Joseph was a tattletale.  It’s a familiar story how Joseph was sold to owners of a caravan and carted off to Egypt.  Who knew that this smug, proud, troublemaking little Hebrew boy would be chosen by God to rise up to unheard of power among the Egyptian royalty and free his people from slavery!

The stories of Miriam, Gideon, Samson, Jonathan, Jonah, Esther, John the Baptist, James the brother of Jesus, Mark, and Onesimus are just as amazing.  The message of this book is to show that God can use anyone for His good purposes.  You don’t have to be an exceptional person because God can do the exceptional with plain, ordinary people.  Through our weaknesses and imperfections, God will showcase His power, wisdom, and love.  From the heart, thank you John MacArthur for this lovely, inspiring book.

I received this complimentary copy from Thomas Nelson Publishing through their BookSneeze program.  A positive review was not required and the opinion expressed here is my own.

Sunday, May 5, 2013

Ms. Maddie Hatter

  Hello blogging friends!  What a beautiful Sunday afternoon we're having here in Wenatchee.  Since I had to come inside to cool off from the heat of the sun, I decided to show you what I've been creating for the past week or so.  My church is having a Mad-Hatter Tea Party and we've been challenged to decorate a hat and wear it to the tea.  Naturally, there will be a prize for the owner of the hat that is voted best hat.  Woo, woo!

I thought it would be fun to go as "Ms. Maddie Hatter" (with name tag also saying AKA Annie).  I plan to wear white pants, a white jacket, a red top, a small red fabric purse with red shoulder strap, and red shoes.  Yep, I think I'm going to have some fun with all of this!

I moulded the hat and brim from chipboard, then covered them with a beautiful white specialty paper.  The tulle rose trim around the brim is from Stampin' Up.  (It's only available until the end of May - it won't be in the new catalog, I'm told.)  The red feather was stamped on red card stock (Stamp A Mania), and the butterflies are from a Martha Stewart punch
The flowers were made using two shades of red, but all from the same die - the Sizzix Quilled Rose/Carnation.  I quilled the dark red roses, but separated the petals and glued them together to make the light red flowers with white center.  For the tea cup, I found a template on line at www.layersofcolor.com called Paper Tea Cup and Saucer.  Actually, it was fairly easy to put together.  I cut out one set using the flowered scrapbook paper and then another set using red scrapbook paper, gluing one cup inside the other; same with the saucer.
Well, that's my tea party hat - I can hardly wait to wear it.  Thanks for letting me share this project with you.  Wishing you a blessed week. 
Annie